Eyes are known to be the windows to your soul, and one of the most popular features to emphasize. Whether you’re pressed for time or happen to be a no-nonsense makeup girl, eyeliner should be a staple in your cosmetic case. If applied correctly, it can wake up your eyes, enhance, and draw attention to them. There›s a wide variety of looks to choose from. No matter what shape of eyes you have - large or small, hooded or bulging - there are some tricks of the trade that can be learned. The following tips will help make your eyes sparkle.
Classic Eyeliner - Begin by simply following your upper lash line, from your inner to outer corners. Classic lines usually do well with pencils, liquid, or gel liners. The trick is to master this skill without pulling on the lids. If you’re a newcomer, start by making small dashes along your lid line, very close to the base of the lashes. Then slowly go back and fill in the empty spaces, to ensure the same width as your original dashes. Although stretching the lids can create a more taut application (especially with pencils), in the long run you can cause sagging. Gel and liquid eyeliners generally won’t drag across your skin, but seem to be more entailed than pencils, which are easiest to draw. To simplify liquid eyeliner, take the side of the liquid applicator and stamp it one dot at a time until connected. Stability is key to placement of liquid eyeliner. The perfect line is applied with flowing wrist movements and a steady hand. Sitting in front of a magnifying mirror with your elbow resting on a table will allow your wrist to move freely and provide better stability and control.
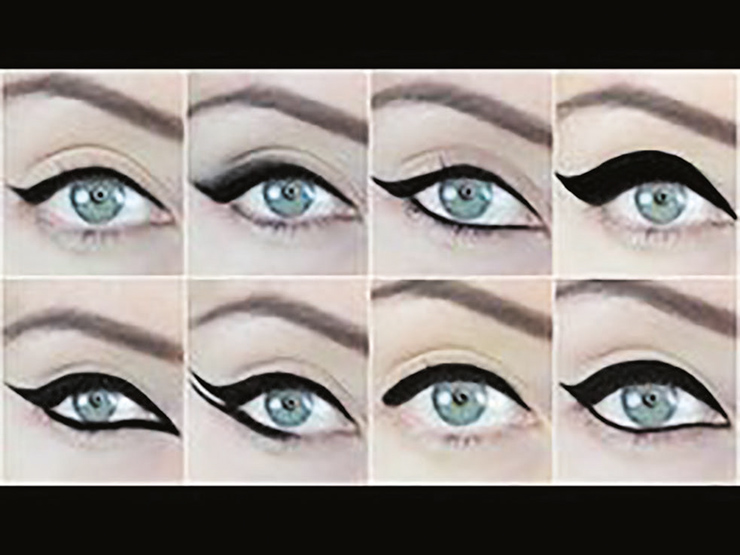
Cat Eyes - This is considered a classic eyeliner technique, which can give your eyes a more lifted look. It adds an instant lift that’s created with the flick of the liner past the outer corner of your eyes. Unless you’re an expert, try applying your line in two steps. The first line should begin from the inner to the outer corner of the eyes, making sure to stop at the outer corners. Next, determine where you want your flick to stop and work from out to in, drawing downward until it connects with the end of the line at the outer corner. With small strokes, fill in where needed, adding more depth and thickness wherever you desire. Once again, don’t pull on the lids, especially if your eyes are hooded, because the wing or flick will get lost in the fold. If you smudge the flick, you can easily clean up your mistakes with a bit of concealer and a liner brush. It’s best to start small and build upon that, as opposed to removing liner.
Winged Liner- This type of liner is quite similar to the cat eye and works well with all types of eyeliner products. The major difference is that the wings at the outer corners are more dramatic and exaggerated in length and width, depending on your preference. Those with hooded or monolid eyes should not trace the natural shape of the eye, because the wing can get lost in the fold. Make sure your eyes are open when drawing your eyeliner. You can dot the outline for the line you will create, then fill in the line. While the upper line of the wing may look incomplete with a slight dip when your eyes are closed, it will be perfect when your eyes open, because the dip is hidden by the hood of your eyelids. Wings can be achieved with various types of liners. However, liquid and felt tip liners often provide precision. To prevent smudging on hooded eyes, which is quite common, opt for waterproof liners. To create a perfect stencil for winged eyeliner, cut two-inch pieces of first aid tape. Place them under the bottom lashline at the outer corner of each eye, positioning them diagonally upward towards the temples of the face.
Smokey Eyeliner - This technique simply includes smudging out the liner, primarily for the bottom liner and outer top corners. To achieve this look, it’s best to incorporate more than one liner or even an eye shadow, depending on your taste. The application process is similar to the cat eye, but usually incorporates bottom eyeliner. You can use a liquid eyeliner first on the upper eyelid, followed by a pencil, shadow, or gel liner, for the bottom lid and for the outer flick. After application, smudge out the bottom liner and the flick to create a smoky look. For best results, use a smudge brush to perfect and blend the bottom liner. Gel pencils and kohl liners are ideal for smoky lines because they glide easily. This look does not call for liquid eyeliners as they are not meant for smudging.
Tightline Technique - Once you have mastered basic eyeliner, you can use a gel pencil to waterline, aka tightline, your upper or lower lids. It requires applying eyeliner inside the lashlines and adds a bit more punch when paired with smoky eyes. It can also work for a more dramatic effect with a light, pearly color, which will make the eyes look larger. This is one of the times you will need to pull on your lid during application, in order to expose the bit of skin between lashes and eyes.
Additional Pointers - Depending on your preference, applying bottom eyeliner is not always necessary, unless you’re looking to create a smoky look. In general, if you find liner application to be a daunting task, begin with the eye that gives you the most difficulty. This saves time from trying to get the less dominant eye to look as good as the other side. It also lets you practice and makes you focus on getting the eyeliner to look as best as possible. Do note that eyeliner usually looks best when it starts off thin and gets thicker as it extends at the outer corners of the eyes.
Practice makes perfect! With a bit of patience, perseverance, and armed with some tricks of the trade, your eyes can look beautiful and become the focal point of your face.
Risselle Naimark is a Professional Freelance Makeup Artist and Skincare Consultant. She carries an extensive line of personalized skincare, cosmetics, and anti-aging products. Risselle is also available for weddings, Bar Mitzvahs, makeup lessons, and all of your beauty needs. She can be reached at 718 263-5517.